
Approving or Reviewing a Course or Program Proposal Using CIM
HOW DO I APPROVE OR REVIEW A COURSE (OR PROGRAM) PROPOSAL?
Updated: June 2025
MSU has an online process for managing course and program changes. The Course Inventory Management software, or CIM (pronounced Kim) is now available for:
- Proposing a new course
- Changing the characteristics of an existing course
- Proposing a new program (i.e., major, minor, option, or certificate)
- Modifying an existing program
CIM is connected to the catalog management software, CourseLeaf, so that course and program changes are automatically reflected in the next MSU catalog, both online and print versions.
One of the features of CIM is an automated workflow for approving and reviewing courses and programs. The intent of this information sheet is to help “approvers” or "reviewers" use CIM to approve or review a new course or program or course or program changes.1
Overview
The steps involved in approving a new course include:
- Receiving a notification that there is a course waiting for your
- Accessing CIM
- Logging into CIM
- Selecting the course to be reviewed
- Reviewing the course proposal
- Approving the course proposal
Step 1: Notification
The CIM software automatically sends an email message to the next approver in the workflow.2 You will receive an email notice that looks something like this:
![]()
When you open the message, it will look something like this:
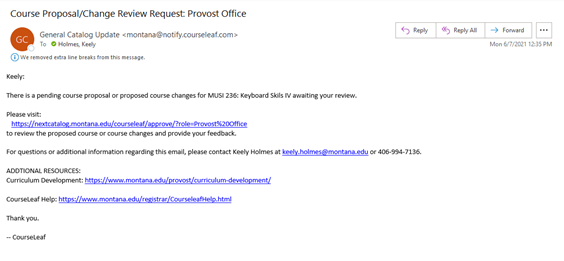
The important feature is the link to the CIM approve page in the middle of the message.
Step 2: Accessing CIM
In most email systems you can simply click the link in the message to open a browser and access the CIM approve page. However, if your email system defaults to plain text the link will not be active. In this situation you will need to copy the link and paste it into the address field of a browser.
When you open the CourseLeaf approve page in a browser, you will see an access screen like the following:
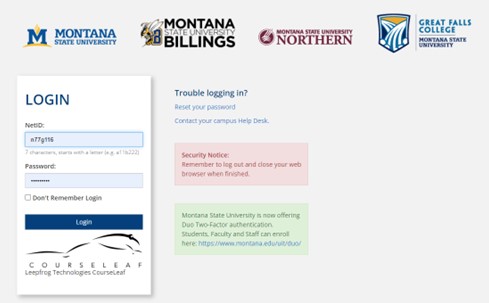
Use your MSU NetID in the Name field, and the same password that you use to log into your MSU computer in the Password field.
Step 3: Logging Into CIM
You will then be given a choice on how you want to authorize your sign in.

You may also see a pop-up like that shown below.
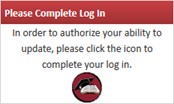
Click the red circle icon in the box to complete your log in.
Note: If you need assistance with CIM access, contact Keely Holmes in the Provost’s Office (x7136).
Note: If you are new to Montana State University, or you find that you cannot access CourseLeaf, contact Keely Holmes (x7136, keely.holmes@montana.edu) in the Provost’s Office.
Step 4: Selecting the course to be Reviewed
Dashboard
After logging into CIM you will see your Dashboard, shown below.
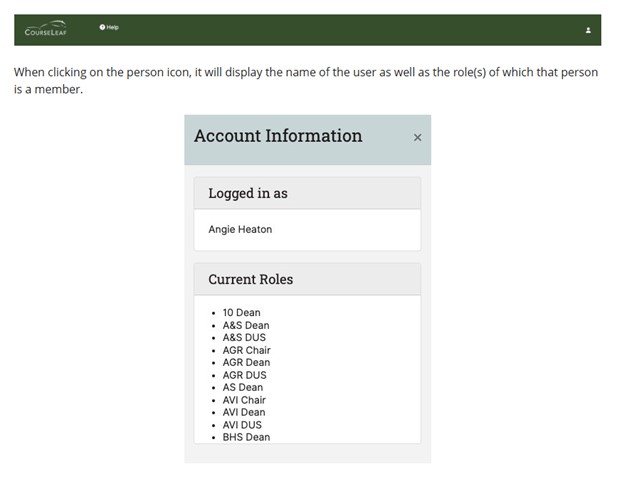
You will see the CourseLeaf logo and the Help question-mark icon on the top-level navigation, along with the person icon.
Items Tab
By default, the Items tab shows My Items in the Types field, and represents everything the user initiated. The Snapshot (thermometer) indicates the number of items in different status categories by color. The table defaults to list all the items in Done status.

If you click on a different status, such as In Progress in the below screenshot, the table will display only those items the user initiated that match the thermometer category.
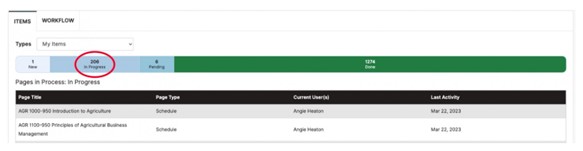
Page in Process Statuses are defined below:
- New or Not Yet Started – New pages that have not been through workflow
- In Progress or Modified – Edited pages that have not been submitted to workflow
- Pending, Workflow Started, or In Workflow - Page is currently in workflow
- Done – Page has completed all steps in workflow
Columns in the table are defined below:
- Page Title: Title of the item. Titles are links to view or edit the item.
- Page Type: Indicates the module the item is assigned to using the same name that has been configured
for each module card. Common Types are as follows.
- Standard – Catalog page
- Shared – Shared Catalog page
- Course - Course Inventory Management page
- Program - Program Invent Management page
- Current user (s): The User or Role the item is currently assigned to
- Last Activity: Displays date of the last action taken on the page.
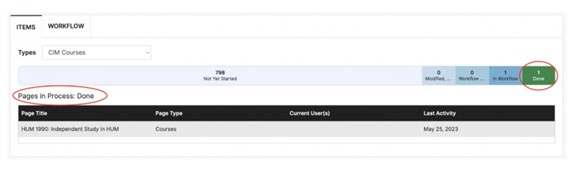
Changing Item Types
You can view any other category of Types to see what and how many items are in different status categories. This display will default to Done status.
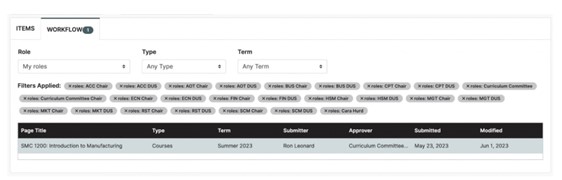
Workflow Tab
The Workflow tab will indicate a number representing how many items they need to review. The tab will also show the Filters Applied with the roles of the user and a table of the line items they need to review in their queue.
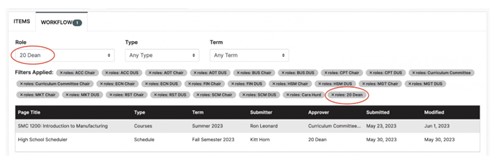
You can also view queues of other roles you don't have. In the below example, the user does not hold the role selected, 20 Dean, but it will display in the Filters Applied area.
This table shows any module items needing action from the logged-in user (approve, rollback, edit) on the proposed changes currently in workflow. The number on the Workflow tab indicates how many items are assigned to the user. All Pages in this table are hyperlinks that open the new Approve pages in a pop-up on the Dashboard screen. Columns in the table are defined as follows:
- Page Title: Title of the item in workflow
- Type: module the item in workflow is from
- Term: term the item in workflow is from
- Submitter: initiator of the changes that are in workflow
- Approver: Role or user needs to act on the item
- Date Submitted: date the item was submitted to workflow
- Modified: date the item was last updated or approved
Workflow Filters
When a logged-in user clicks on the Workflow tab, all the records the user is assigned in workflow display by default. This is part of the My Roles selection. If the user wants to change the displayed pages, they can use the dropdown for Roles, Type, and Term to customize which pages are shown in the Workflow Tab. The Filters Applied section shows which filters from the Role dropdown the My Roles belong to. Users can remove specific rules by clicking the X next to the filter that is applied to their view.
By using the dropdown selections, users choose specific Role, Type, and Term combinations they would like to display. The filter selections work as an AND statement between categories, and on OR statement within each category; for example, filter pages that have Type of Course OR Type of Syllabi AND term of Fall 2025.
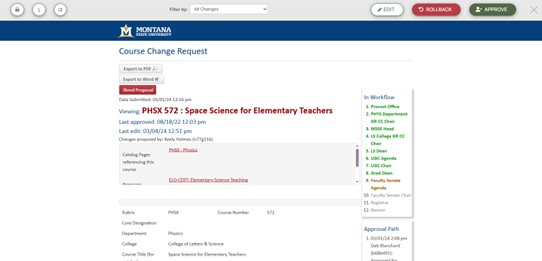
Approve Pages
Below is an example of what the approval screen looks like once you've clicked on the course/program you want to review.
Clicking any of the lines on the Workflow table will open the Approve Pages Interface Frame within the CourseLeaf Dashboard. This allows users to approve their pages from the CourseLeaf Dashboard without navigating to the previous Approve Pages link.
- Print - click the printer icon to see a print preview window to print the page. The "filter by" applies to the printed document, therefore choosing "all changes" will print red/green markup, and choosing "hide changes" will show only the proposed final version.
- Page Information - click the blue i icon to display the information for that page
- Title - Title of the page
- Last updated - Date the page was last updated
- Template - The module the page belongs to
- Page Authors - Page owners of the page
- Workflow - Step in workflow that the page currently is on, for CAT pages
- College - College the page belongs to
- Department - Department the page belongs to
- Filter By – Allows users to select a user to see the changes that person made to the page. Hide changes when selected to removes the red and green markup from view on the page. All Changes allow for the approver to view all of the red and green markup from all users
- Edit – Allows the User the Edit the page or content that is in workflow. For CIM Proposals, the proposal opens in a new window, and for Catalog Pages, the edit toolbar appears
- Approve - click Approve when finished reviewing, so the page advances through the workflow and is removed from the Workflow queue
- Rollback – click rollback to send it back to any steps in the workflow. To do so, enter in a comment/reason
- Comment/Reason – Space used to add in Comments and Reasons to save to the workflow. This field is required when using the Rollback option
- Close – Closes the Approve Pages Interface Frame and returns the user to the CourseLeaf Dashboard.
However, if you are not authorized to review an item and click Approve, it will generate a pop-up box saying that that you cannot act in that role. When clicking OK to acknowledge the pop-up, the Approval Screen will show a similar message.

Step 5: Reviewing Course Proposals
When you click on the proposal you want to approve or review, you will be taken to the screen shown below. Functionality is essentially the same as it was before, with the review screen being bigger and taking up the entire window.
Attached materials such as the syllabus are linked in this view.
Editing Course Proposals
In most cases approvers will not need to edit the course proposal, but it is possible. Use the Edit button found in the upper right hand corner of the approval page to open the course proposal in a new window for editing.

Note: The Rollback button (shown above) allows you to send the proposal back one or more steps in the workflow process. The MSU review process allows approvers to contact the submitter to discuss potential proposal updates, and then allows approvers to add information to the proposal (usually in the Reviewer Comments box) without sending the proposal back. The Rollback button is used fairly rarely at MSU. We prefer that you contact Keely Holmes, x7136, regarding necessary edits before rolling back. It will likely save a lot of time and effort, and will avoid the chance that the role you've rolled back to missing the notification causing the proposal to stall.
You CANNOT Rollback a Special Topics course (x91). Only an Courseleaf Administrator can edit a Special Topics course after it's been saved and/or pushed into workflow. If you need edits made on a Special Topics course, contact Keely Holmes in the Office of the Provost (x7136).
From the edit window you can access attached files. There is also a text field at the bottom of the form for reviewer’s comments.

This field is used to document any changes made to the course proposal as it moves through the review process, or to add comments that you want other approvers to see.
Use the Save Changes button to save any changes you have made to the proposal, including any added comments.

Step 6: Approving Course Proposals
Once you are OK with the course proposal, you approve the proposal simply by clicking the Approve button on the CIM approve page.

This completes your review process and moves the proposal on to the next approver in the workflow.
_______________________________________________________________
1 This webpage will use a course approval as an example, but the process is identical for program approvals.
2 Committee members get an FYI notice. This provides a link to review to proposal, but no approval is required. The Chair of the committee is the approver.
If you have questions about CIM, please contact one of the following individuals.
Keely Holmes
Office of the Provost
406-994-7136