
Softwares
Information and tutorials on software that can be found at the microscopy facility.
CryoSPARC on Tempest
Tempest contains a single, managed installation of CryoSPARC that can be used by any members of Tempest with their allocated Tempest resources. CryoSPARC on Tempest is feature complete, containing the latest, or near-latest release of CryoSPARC, 3D-Flex integration, and Topaz integration.
Tempest CryoSPARC URL
http://tempest-cryosparc.msu.montana.edu:39000
Getting Access
Because of permissions issues regarding the way CryoSPARC executes jobs, a service account run by RCI and the Cryo-EM Facility must be granted access to your group's data on Blackmore, and ability to run jobs on Tempest. Only RCI and the Cryo-EM Facility will have access to this account, and will never use it to log in and view data, unless explicitly asked to by the PI for troubleshooting reasons. For a new group that has never used cryoSPARC on Tempest, please have the PI contact cryo-em_facility@montana.edu to have appropriate permissions arranged.
Once access has been arranged, accounts must be registered on the CryoSPARC web server. This server is accessible at http://tempest-cryosparc.msu.montana.edu:39000
If you are having errors in your web browser when accessing this site, ensure the URL begins with http:// and not https://
Account Registration
To register accounts, contact cryo-em_facility@montana.edu with a list of first and last names, and associated emails for users you would like to have access to CryoSPARC. That will initiate the registration procedure. You will be given a 4-character token. Navigate to the CryoSPARC homepage, and select "New Account"

Fill out the form with the email that you submitted, and the token you received back, and select "Create Account":

Once you have an account and can log in, you can begin to submit jobs.
Working With Data
To import data, run an "Import" job and select the path for your movies/micrographs.
By default, the path will show you a directory called $HOME that will look like this:

To find your data on Blackmore, replace the $HOME with /mnt/blackmore and press "Enter" on your keyboard. Your Blackmore share should now be visible:

From there, you can double-click directories to enter them.
Submitting Jobs to Tempest
To submit CryoSPARC jobs to Tempest, just use the normal GUI to queue them like normal. You will be given access to two "Lanes", one that submits jobs to the Tempest GPU Priority partition, using your group's reserved resources, and one that submits it to the Tempest GPU Unsafe partition, which can take advantage of unused capacity on the cluster, but with the risk that the job may be canceled to make room for other priority users should the need arise.

Occasionally, you may wish to alter the time that the job is allotted, or the amount of system memory that is available. To change this parameters, you can select "Cluster submission script variables:"

time_hr_min_secis in the format hr:min:sec and defaults to72:00:00ram_gb_multiplierwill multiply the amount of RAM that cryoSPARC reserves for a job by that value. For instance, if cryoSPARC reserves 40GB by default, setting this value to 2 will reserve 80GB. Try not to use more than 124 GB total per GPU.
Topaz
Topaz is available for use in cryoSPARC, as well as throughout Tempest. To select which version of Topaz to run, when setting up the Topaz job, press the directory icon below "Path to Topaz executable":

By default, this should place your file picker back in $HOME, but if it doesn't, you can type $HOME into the path and press Enter Once again, navigate by double-clicking into the topaz directory, select the version you want, ending in .sh
Management
CryoSPARC Installation
The information in this section details how CryoSPARC was installed and is managed. The information in this section is not relevant to most users.
CryoSPARC is running on a virtual machine managed by RCI. The user running CryoSPARC is the active directory service account cryosparc. This user's home folder contains the following directories:
/home/cryosparc
  ├── cryosparc_cluster
  ├── cryosparc_db
  ├── cryosparc_master
  ├── cryosparc_worker
  ├── slurm-examples -> /mnt/shared/slurm-examples/
  ├── test_project
  └── topaz
cryosparc_master. The configuration file for the Master process:# Instance Configuration
export CRYOSPARC_LICENSE_ID="715d65d8-6d6f-11ec-b46a-a3ced205bdbe"
export CRYOSPARC_MASTER_HOSTNAME="tempest-cryosparc.msu.montana.edu"
export CRYOSPARC_DB_PATH="/home/cryosparc/cryosparc_db"
export CRYOSPARC_BASE_PORT=39000
export CRYOSPARC_DB_CONNECTION_TIMEOUT_MS=50000
export CRYOSPARC_HOSTNAME_CHECK="tempest-cryosparc.msu.montana.edu"
# Security
export CRYOSPARC_INSECURE=true
export CRYOSPARC_DB_ENABLE_AUTH=true
# Cluster Integration
export CRYOSPARC_CLUSTER_JOB_MONITOR_INTERVAL=10
export CRYOSPARC_CLUSTER_JOB_MONITOR_MAX_RETRIES=1000000
# Project Configuration
export CRYOSPARC_PROJECT_DIR_PREFIX='CS-'
# Development
export CRYOSPARC_DEVELOP=false
# Other
export CRYOSPARC_CLICK_WRAP=true
The license key is registered to cryo-em_facility@montana.edu
CryoSPARC Worker is installed under the cryosparc_worker directory. The configuration file for the Worker:
export CRYOSPARC_LICENSE_ID="715d65d8-6d6f-11ec-b46a-a3ced205bdbe"
export CRYOSPARC_USE_GPU=true
export CRYOSPARC_CUDA_PATH="/mnt/shared/moduleapps/eb/CUDAcore/11.1.1"
export CRYOSPARC_DEVELOP=false
The worker process is not installed in a traditional manner, due to the cluster setup. It is installed not as the "Standalone", where the master and worker are the same install, but as the separate installation. However, no SSH access between the master and worker is needed because of the cluster configuration.
One potential flaw in this setup is that the CUDA path is hardcoded into the configuration. This is unavoidable at the moment, but if CUDA functionality breaks, one thing to check is if that path still works.
Systemd Service
cryoSPARC can be managed via systemd. Currently, a systemd service file is installed
at /home/cryosparc/.config/systemd/user/cryosparc-supervisor.service:
[Unit]
Description=Process Monitoring and Control Daemon for CryoSPARC

[Service]
Type=forking
Environment="MODULEPATH=/mnt/shared/modulefiles:/mnt/shared/ebmodules/eb/all/"
Environment="MODULEPATH_modshare=/mnt/shared/modulefiles:1"
Environment="MODULESHOME=/usr/local/Modules/4.6.1"
Environment="MODULES_CMD=/usr/local/Modules/4.6.1/libexec/modulecmd.tcl"
Environment="BASH_ENV=/usr/local/Modules/4.6.1/init/bash"
Environment="ENV=/usr/local/Modules/4.6.1/init/profile.sh"
Environment="PATH=/home/cryosparc/cryosparc_master/deps/external/mongodb/bin:/home/cryosparc/cryosparc_master/bin:/home/cryosparc/cryosparc_master/deps/anaconda/envs/cryosparc_master_env/bin:/home/cryosparc/cryosparc_master/deps/anaconda/condabin:/usr/local/Modules/4.6.1/bin:/usr/local/bin:/usr/bin:/usr/local/sbin:/usr/sbin:/opt/slurm/20.02.3/bin:/opt/slurm/20.02.3/sbin:/home/cryosparc/cryosparc_master/bin"

ExecStart=/home/cryosparc/cryosparc_master/bin/cryosparcm supervisord -c /home/cryosparc/cryosparc_master/supervisord.conf
ExecStartPost=/home/cryosparc/cryosparc_master/bin/cryosparcm start --systemd
PIDFile=/home/cryosparc/cryosparc_master/run/supervisord.pid
WorkingDirectory=/home/cryosparc/cryosparc_master

[Install]
WantedBy=default.target
It is important to note that this is a user process, not a system process. Since systemd
sometimes likes to kill user processes after logout, loginctl enable-linger was enabled for the cryosparc user. This sometimes still fails for unknown reasons,
so if the cryoSPARC processes keep dying, check if systemd is killing them after logout.
Do not use cryosparcm start and cryosparcm stop to manage cryoSPARC. Instead, use systemctl (example: systemctl --user start cryosparc-supervisor.service)
Updates
cryoSPARC can be updated via the cryosparcm program. To do this, first shut down the systemd service:
systemctl --user stop cryosparc-supervisor
Warning! This will end all currently running jobs.
Then, update cryoSPARC:
cryosparcm update
This procedure should update cryoSPARC to the latest version.
Sometimes the cryosparcm update command takes a very long time to download. In this case, you can run cryosparcm update --download-only while cryoSPARC is running, and stop cryoSPARC after the download is complete, and run cryosparcm update --skip-download
Patches
cryoSPARC considers patches different than updates. Patches may solve critical bugs. To check for patches, run:
cryosparcm patch --check
If a patch is found, download the patch manually:
cryosparcm patch --download-only
Copy the downloaded cryosparc_worker_patch.tar.gz to /home/cryosparc/cryosparc_worker. Go to that directory and run bin/cryosparcw patch.
Then, reload the interface and refresh the job types:
cryosparcm cli "reload()"
cryosparcm cli "refresh_job_types()"
Database
cryoSPARC uses MongoDB to manage users, projects, jobs, etc. This database is currently
kept in the cryosparc_db folder. Backups are enabled using systemd timers and the existing cryosparcm backup functionality.
cryosparc_backup.timer:
[Unit]
Description=cryosparc_backup

[Timer]
OnCalendar=daily
Persistent=true

[Install]
WantedBy=timers.target
cryosparc_backup.service:
[Unit]
Description=cryosparc_backup

[Service]
Type=oneshot
ExecStart=/home/cryosparc/cryosparc_master/bin/cryosparcm backup --dir=/mnt/blackmore/cryoem/cryosparc_db_backups
WorkingDirectory=/home/cryosparc
These services are installed under /home/cryosparc/.config/systemd/user and have been enabled.
Some sort of timer to manage old backups should probably be created.
Lane Management
cryoSPARC can integrate with SLURM. To add a SLURM cluster as a lane, two files are needed:
- A
.json(cluster_info.json) file containing the cluster details and configuration - A shell script (
cluster_script.sh) to use as the template for a job submission script.
These two files must be located in the same directory, and to add them to cryoSPARC
as a new lane, run cryosparcm cluster connect in that directory. A different directory is needed for each lane. Currently, the directory /home/cryosparc/cryosparc_cluster/ contains directories by each Tempest group. Inside that directory are further directories,
by lane name:
/home/cryosparc/cryosparc_cluster
├── lawrence
│   ├── gpupriority
│   │   ├── cluster_info.json
│   │   └── cluster_script.sh
│   └── gpuunsafe
│       ├── cluster_info.json
│       └── cluster_script.sh
└── wiedenheft
    ├── gpupriority
    │   ├── cluster_info.json
    │   └── cluster_script.sh
    └── gpuunsafe
        ├── cluster_info.json
        └── cluster_script.sh
To add a group, simply duplicate one of the existing folders, and make changes to
the files. Then run cryosparcm cluster connect in each new folder.
Configuration Files
cluster_info.json
{
"qdel_cmd_tpl": "scancel {{ cluster_job_id }}",
"worker_bin_path": "/home/cryosparc/cryosparc_worker/bin/cryosparcw",
"qinfo_cmd_tpl": "sinfo --format='%.8N %.6D %.10P %.6T %.14C %.5c %.6z %.7m %.7G %.9d %20E'",
"qsub_cmd_tpl": "sbatch {{ script_path_abs }}",
"qstat_cmd_tpl": "squeue -j {{ cluster_job_id }}",
"send_cmd_tpl": "{{ command }}",
"name": "lawrence_gpupriority",
"cache_path": "/home/group/cryoem",
"cache_reserve_mb": 10000
}
Things to modify when adding new lanes:
- "name" is what the lane will be named in cryoSPARC. Current syntax is groupname_tempestpartition
- "cache_path" should point to the group's group directory on Tempest. The cryosparc user will need to have r/w to this directory.
- "cache_reserve_mb" is how much free space cryoSPARC will always leave empty. This can be customized as required.
For a full list of possible parameters, see cryoSPARC's documentation.
cluster_script.sh
#!/bin/bash
#SBATCH --account=priority-cryoem
#SBATCH --job-name=cryosparc_{{ project_uid }}_{{ job_uid }}
#SBATCH --partition=gpupriority
#SBATCH --output={{ job_log_path_abs }}
#SBATCH --error={{ job_log_path_abs }}
#SBATCH --nodes=1
#SBATCH --mem={{ (ram_gb|float * ram_gb_multiplier|float)|int }}G
#SBATCH --ntasks-per-node=1
#SBATCH --cpus-per-task={{ num_cpu }}
#SBATCH --gres=gpu:{{ gres }}:{{ num_gpu }}
#SBATCH --time {{ time_hr_min_sec }}

module load CUDA/11.1.1-GCC-10.2.0

available_devs=""
for devidx in $(seq 0 1);
do
    if [[ -z $(nvidia-smi -i $devidx --query-compute-apps=pid --format=csv,noheader) ]] ; then
        if [[ -z "$available_devs" ]] ; then
            available_devs=$devidx
        else
            available_devs=$available_devs,$devidx
        fi
    fi
done
export CUDA_VISIBLE_DEVICES=$available_devs

srun {{ run_cmd }}
Things to modify when adding new lanes:
--accountshould be changed to the Tempest account of the group.--partitionmay need to be changed to be the correct partition that this lane will submit jobs to.
Additionally, there may be some optimization that can be performed here. For instance,
should Tempest ever acquire > 2 GPU systems, the script at the bottom may need the devidx increased to 0 3 or whatever the number of GPUs is. However, it's currently untested if that script
is even required, or if SLURM will handle everything itself just fine. Furthermore,
things like RAM and nodes, ntasks, etc might be able to be optimized.
File Access
RCI must add the cryosparc user (uid=200248) to the Unix group for each lab/group using Tempest. Then, their Blackmore share
msut be mounted at /mnt/blackmore/<group_name>. However, CryoSPARC will be unable to access the files until it is fully restarted.
To perform a full restart, one must first stop the cryosparc-supervisor.service and then log out of all instances with loginctl terminate-user cryosparc. Then, log back in, and the systemd service should automatically start.
If there are issues getting access to the new group's folder, check that the cryoSPARC supervisor process is running as the correct groups:
grep '^Groups' /proc/1866597/status
This should return a list of integers that correspond to the group IDs the process is running with. Ensure the new group is present.
Cluster Variables
In both the cluster_info.json and cluster_script.sh files, environment variables can be used by double curly bracketing them: {{ variable }}. For instance, {{ time_hr_min_sec }} is set to a variable. These variables can be set to an instance-wide default by administrators,
but individual users can then modify them at submission time if needed.
To set instance wide defaults, log into cryoSPARC with an administrator account. One the left-hand side of the screen, select the key icon:


Instance wide defaults can be set at the top. These will apply to all lanes on the instance. However, individual lane-wide defaults can be set below if desired.

When users submit jobs, they can override this defaults on a per-job basis. This is helpful, for instance, if there is a pending shutdown of Tempest and the job timer needs to be shortened to accommodate jobs in the meantime. See "Submitting Jobs to Tempest" for more information on submitting jobs.
Lane Access
Specific lanes can be restricted to specific users. Administrators should ensure that new users have access restricted to only their group's Tempest resources.This can be done by logging in with an administrator account, and navigating to the Admin page:
In the top menu that opens, navigate to "Lane Restrictions":

Select a user on the left:

A new screen will open showing available and restricted lanes. Set these using the checkboxes and arrow icons accordingly.

User Management
Users must be added by an administrator. To do this, log into cryoSPARC with an administrator account, and select the key icon on the left-hand side of the screen:


At the top right of the screen, select "Create New User":

Enter the details. The email entered here must be the one that is used when the user finishes the registration process:

Once done, a token will display. Email that token to the user, and tell them to follow the registration steps detailed above.

Once an account is created, follow the instructions detailed above for setting up their lane access.
RELION Single Particle Reconstruction Tutorial
This tutorial is largely based off the advanced RELION documentation available here.
This tutorial is less about the fundamentals of single particle analysis, and more about getting RELION jobs to successfully run, as well as understanding the UI and job parameters. For more advanced single particle analysis information, considering taking course BCH 550.
Getting Started
RELION will accept any input of .tif, .tiff, or .mrc micrographs, gain corrected, or not gain corrected. You also will need the MTF of
the detector, which for the Gatan K3 here at MSU, you can download here. If you have not gain corrected, you will need the gain files in a compatible format.
RELION's basic data hierarchy is that you run the program from a directory that contains the image files. These files can be in a sub-directory, but not in a parent directory. If the files are in a parent directory, you can try making a symbolic link to the directory you are running RELION from:
ln -s <path_to_files> <path_to_relion>/data
Note: Not all networked file systems support symbolic links. Your mileage may vary.
RELION will create folders inside the directory you run it from, as well as a number of hidden files. It organizes the folders by job type, and them creates a series of symlinks into them from other jobs. This can be quite confusing, so try to stay organized.
If you wish to download a tutorial data-set, you can do that with this command:
wget ftp://ftp.mrc-lmb.cam.ac.uk/pub/scheres/relion30_tutorial_data.tar
then, extract the files with:tar -xvf relion30_tutorial_data.tar
To start RELION, simply run the command relion on a computer on which it is installed.
If you are running RELION on the RCI Tempest cluster, please see the bottom of this page for specific instructions.
Importing Files
To import files, select "Import" from the job-list on the left:

In the main portion of the UI, you will now see options for the job, with tab separators
on top:

Set the following in the Movies/mics tab:
- Import raw movies/micrographs? Yes
- Raw input files: Movies/*.tiff
- This is the folder in which your data is stored. It is relative to where you have run RELION from. To import more than one file, you must specify a wildcard ( * ) followed by the file extension (in this case, .tiff). That will select all the .tiff files in the directory. Change the file extension depending on the micrograph file format.
- Optics group name: opticsGroup1
- You can set this however you like.
- MTF of the detector: This is the MTF file for the detector. For the tutorial, it is mtf_k2_200kv.star which you will need to download from Gatan's website. For data collected on the Arctica, use the file provided here by the facility.
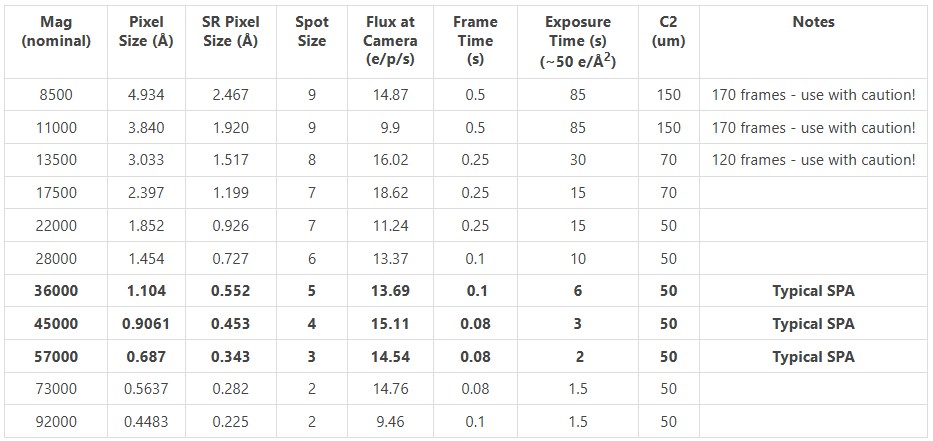
- Pixel size (Angstrom): Pixel size in angstroms of your micrographs. For the tutorial, this is 0.885. For data collected at the facility, refer to this table.
- Voltage (kV): for both the tutorial, and the Arctica, this is 200
- Spherical aberration (mm): For the tutorial, this is 1.4. For data collected off the Arctica, this is 2.7
- Amplitude contrast: 0.1 is usually sufficient
- Beamtilt in X (mrad): 0
- Beamtilt in Y (mrad): 0
Others tab:
- We will leave the default options
Running:
- We will leave the default options (don't submit to queue)
Now, you can give the job an alias/name. This will make sorting through jobs easier in the future:

After that, just click Run!:

This job should run very quickly. Once it is finished, click the title of it in the "Running jobs" window, and it will move to "Finished jobs". Here is the output for the tutorial:

Motion Correction
Most micrographs are recorded as files with multiple frames that must be motion corrected to maximize the alignment of each frame on top of each other. Select the motion correction job, and enter the following parameters in each tab (skipped parameters we will leave as default):
I/O:
- Input movies STAR file: Select the "Browse" button, browse to the output of your previous job (movies.star)
- First frame for corrected sum: 1
- Last frame for corrected sum: -1
- This will use all frames
- Dose per frame (e/A2): 1.277 for the tutorial. For your data, this will be the total dose in electrons per square Angstrom that you have calculated before the data collection.
- Do dose weighting? Yes
- Save non-dose weighted as well? No
- This is usually necessary and just takes up excess space.
- Save sum of power spectra? Yes
- Sum power spectra every e/A2: 4
Motion:
- Bfactor: 150 is usually a good starting point, but you can calculate this yourself if you wish to.
- Number of patches X, Y: 5, 5 usually works well.
- Gain-reference image: For the tutorial, browse to Movies/gain.mrc. If your data is already gain-corrected, you don't need this file. If it is not, get the gains used for your data collection and insert them here (specifically, the gain for the camera mode you used - counting, or linear. This will almost always be counting).
- Use RELION's own implementation? Yes
Running:
- Number of MPI procs: 1
- Number of threads: 12
- 12 is usually sufficient but you can increase this as long as you have CPUs available.
- Submit to queue? No
NOTE: You will need to use the queue if you are using Tempest or some other central cluster.
Go ahead and run the job. This should take about 5 minutes on a reasonably fast computer.
The output will be motion corrected frames. You can view the log file when it's finished
by selecting the finished job and opening the logfile.pdf via the "Display" drop-down menu:

If you are running RELION remotely, this may take a moment to open.
NOTE: If running on Tempest, .pdf files will fail to open. See documentation below for how to view .pdf files on Tempest.
CTF Correction
Once you have motion-corrected, frame-aligned micrographs, you can run the CTF correction to correct for the defocus-dependant contrast transfer function of the images. RELION doesn't have a CTF correction routine built-in, but is capable of "wrapping" two different CTF correction programs: ctffind-4.1, and Gctf. This facility does not have Gctf available, so we will use ctffind-4.1 instead.
I/O:
- Input micrographs STAR file: Browse to the output of your motion correction job. Should be called "corrected_micrographs.star"
- Use micrograph without dose-weighting? No
- Estimate phase shifts? No
- Amount of astigmatism (A): For the tutorial, this value is 100. For most data collected off the Arctica, 100 is probably fine as well. If you had astigmatism you couldn't do away with, enter that value here.
CTFFIND-4.1:
- Use CTFFIND-4.1? Yes
- CTFFIND-4.1 executable: On most computers, this should just be ctffind. However, if
that fails, find the ctffind executable (run
which ctffind) and enter the path for that here. - Use power spectra from MotionCorr job? Yes
- Use exhaustive search? This is usually not necessary.
Running:
- Number of MPI procs: 6 is usually sufficient here, and the tutorial only takes a few seconds. However, for large data sets, you can play with this number.
Once you run the job, you can view the outputs including a log file displaying the CTF corrections for each micrograph.
Particle Picking
The next step is to pick your particles. There are three main ways to do this:
- Manual picking. You visually inspect and select each particle.
- Blob or "Laplacian of Gaussian" (LoG) picking, where an algorithm picks particles based on their gray-value and size.
- Template or Reference based picking, where you provide a 2D projection of the structure, and an algorithm tries to match that.
Frequently, people will start with either manual picking, or LoG picking, generate an initial set of templates from a small subset of data, and then go back and pick all the particles using those templates. Sometimes, multiple iterations of picking and templating are used. This tutorial will cover all three methods briefly, but for the tutorial dataset, it is recommended to just use LoG picking. For more complicated datasets, you will want to come up with a strategy that works for your data.
Manual Picking
Manual picking is very straightforward. You open the micrographs, and select the particles you want to pick. You save those coordinates, and send them into the extraction job.
I/O:
- Input micrographs: Browse to your CTF-corrected micrographs (micrographs_ctf.star) and select them.
Display:
- Particle diameter (A): This is the size of the circle that RELION will draw. This is not the size of the extracted particles, so don't worry too much about this number.
- The defaults usually work well for everything in this tab, but if the micrographs look just white or black, or too washed out to see anything, try playing with the scale, contrast, and black and white values.
- A lowpass filter of 20 A is usually recommended, but if the particles are too blurry, or don't have enough contrast, try changing this number.
Laplacian of Gaussian (LoG) Picking
LoG picking is analogous to a "blob" picker and will pick particles based on gray-value and size compared to the surrounding area. It is useful when the particles are fairly obvious (i.e. apoferritin) or are well separated. It is nice because it requires no human-input or manual picking. However, if it is not working, consider switching approaches. LoG picking is available under the "Auto-picking" job.
I/O:
- Input micrographs: Browse to your CTF-corrected micrographs (micrographs_ctuf.star) and select them.
- Pixel size in micrographs (A): -1 will let RELION read this information from the .star file. If you have not re-scaled the files outside of RELION, -1 should be sufficient. If you have altered the pixel size yourself, enter the new pixel size here.
- 2D references: Leave blank
- OR: provide a 3D reference? No
- OR: use Laplacian-of-Gaussian? Yes
Laplacian:
- Min. diameter for LoG filter (A): The diameter in angstroms at which any smaller will not be considered for picking. For the tutorial, set this to 150
- Max. diameter for LoG filter (A): The diameter in angstroms at which any larger will not be considered for picking. For the tutorial, set this to 180
- Are the particles white? In most cases, including the tutorial, this will be no. If you have inverted the micrographs, set this to yes.
- Maximum resolution to consider (A): Typically, set this to 20. This is the value to which the micrographs will be down-scaled for picking. Downscaling will help to reduce noise and accentuate the particles. To skip down-scaling,
- The default thresholds are usually sufficient except in more advanced use-cases.
Running:
- Run with a single MPI proc.
When done, the job should output a .star file called "autopick.star" that contains the coordinates for all the picked particles.
Reference-based Picking
If you have a reference, or series of references, of what the particles should look like, then you can use the Reference auto-picker to search your micrographs and match to that reference. Reference-based auto-picking is usually more sensitive than LoG picking, and references can easily be created from existing 2D class averages or projections of 3D reconstructions. The process is also very computationally efficient. However, beware of reinforcing existing bias with the reference-based picking. The reference-based picking is available as a tab in the "Auto-picking" job.
I/O:
- Input micrographs: Browse to your CTF-corrected micrographs (micrographs_ctuf.star) and select them.
- Pixel size in micrographs (A): -1 will let RELION read this information from the .star file. If you have not re-scaled the files outside of RELION, -1 should be sufficient. If you have altered the pixel size yourself, enter the new pixel size here.
- 2D references: A STAR file or MRC stack containing the 2D references to be used. Only use 2D references created in RELION here. Frequently, these are selected 2D class averages.
- OR: provide a 3D reference: This option, and the subsequent options can be selected
if you wish to provide a 3D map that is then projected with some angular sampling
into 2D images that are used for template matching. To create a new map from an atomic
model, use UCSF Chimera's
molmapcommand. Be sure to keep pixel sizes the same.
References:
- Lowpass filter references (A): 20 is usually sufficient. Set to -1 to skip a Lowpass filter, although this is not recommended because signal gets extremely noisy.
- Highpass filter (A): -1 disables the highpass filter. Highpass filters are usually not recommended.
- Pixel size in references: -1 will be assumed to be the same in the reference as the micrograph. If they are different, you can specify the reference pixel size here.
- Mask diameter: -1 disables a mask. Alternately, you can apply a circular mask to the references by specifying the diameter in angstroms here.
- In-plane angular sampling (deg): this specifies the in-plane rotation sampling for the reference when matching to particles. 5 is usually sufficient here. Increasing this (setting it to a smaller number) will give finer sampling, but slow down calcualtions. At a lowpass filter of 20 angstrom, finer sampling rarely results in better matches.
- References have inverted contrast? Yes for references generated in RELION.
- Are References CTF corrected? Yes for references generated in RELION.
- Ignore CTFs until first peak: No
Running:
- Run with a single MPI process.
Particle Extraction
All that particle picking does is create a list of coordinates in each micrograph where RELION believes to have found a particle (or, if manually picking, where you specified that there is a particle). It is now usually advantageous to extract the particles into their own images, so that the entire micrograph doesn't need to be loaded every time you want to work with a particle. To do this, run the "Particle extraction" job.
I/O:
- micrograph STAR file: Browse to the micrographs_ctf.star file from your CTF correction (extract the particles from CTF corrected micrographs).
- Input coordinates: Browse to the .star file from your picking job.
- OR re-extract refined particles: No at this point.
extract:
- Particle box size (pix): Set this to something large enough to contain about 2x-3x your particle size. For the tutorial, 256 seems to work. Keep this a multiple of 8
- Invert contrast? Usually it is OK to set this to Yes
- Normalize particles? Again, set this to Yes
- Diameter background circle (pix): -1 is usually sufficient when normalizing (sets it to 75% box size).
- Stddev for white dust removal: -1 will disable this (recommended)
- Stddev for black dust removal: -1 will disable this (recommended)
- Rescale particles? You can set this to rescale the particles to a new box size, specified in pixels. For the tutorial, select Yes
- Re-scaled size (pixels): Keep this a multiple of 8. For the tutorial, it is recommended to set this to 64
Running:
- Run with a single MPI process.
2D Class Averaging
Once you have extracted your particles, you now want to try and align them together to generate the 2D class averages that each represent a distinctive 2D projection of your 3D particle. These class averages will be used to construct your 3D model. 2D class averaging is also a good way to remove junk particles, because (non-systemic) noise will not average constructively, making it easy to classify bad particles as junk.
I/O:
- Input images STAR file: Browse to the particles.star file from your extraction job.
CTF:
- Do CTF correction? Yes
- Ignore CTFs until first peak? No
Optimisation:
- Number of classes: 50 for the tutorial. Otherwise, you may set this as desired.
- Regularisation parameter T: Adjusts weighting of experimental data vs prior. Recommended to leave this at 2 to start. Values greater than 1 put more weight on experimental data.
- Number of iterations: 25 is usually fine. For smaller particles, or particles with lower signal-to-noise, try increasing this.
- Use fast subsets (for large data sets)? If enabled, this will start with fewer particles for the first 5 and then 10 iterations, before aligning all the particles. This may speed up calculations, but usually it is recommended to leave this set to No.
- Mask diameter (A): The diameter of the circular mask to apply to particles before aligning them. Set this to about 30%-50% larger than your particle diameter. For the tutorial, a mask size of 200 works well.
- Mask individual particles with zeros? This will set the area outside of the mask to either zeros, or random noise. We usually leave this to Yes
- Limit resolution E-step to (A): Set this to -1 in nearly all situations. If set positively, this will help combat overfitting with small, low signal-to-noise particles.
Sampling:
- Perform image alignment? Yes
- In-plane angular sampling: 5-6 works well here.
- Offset search range (pix): 5 works for the tutorial. Increase this if you think your particles aren't well centered to begin with.
- Offset search step (pix): If you increase the range, you may want to increase the step size to be coarser, otherwise your calculations may slow down too much. Keeping this so that you only have a total of 5 searches should keep calculations plenty quick enough.
- Allow coarser sampling? No works well unless you are having problems with your alignments. If you set this to Yes, RELION will automatically expand the rotational and translational parameters if it is having trouble aligning in the initial iterations.
Compute:
- Use parallel disc I/O? Set this to Yes unless running over NFS (in most cases, NFS should work). If you run into issues with your job failing and you are reading from SMB, try settings this to No. Reading from local storage, Yes should nearly always work and will speed up calcualtions.
- Number of pooled particles: The number of particles that are read into memory at once if processing in batches. This is multiplied by the number of threads. You can increase this until you run out of memory. For the tutorial, 3 is usually sufficient.
- Pre-read all particles into RAM? Yes for the tutorial if running on cetus, or Tempest. The formula for memory usage is
(N * box_size * box_size * 4 / (1024 * 1024 * 1024))in GB. If parallel disc I/O is disabled, only the leader process (not compute processes) will pre-read the particles, and may not have enough available memory. - Combine iterations through disc? Leave this to No if working locally. If working across a network (i.e. you are queuing the job on one system, but running it on another, such as with Tempest) and you see large delays between iterations, try enabling this.
- Use GPU acceleration? Yes if running on a system with GPUs.
- Which GPUs to use: You can specify the GPUs to use here with a colon and comma separated
list (click the "?" for examples) starting at 0, but if you leave this blank,
mpirunwill automatically allocate all available GPUs.
Running:
- Number of MPI procs: RELION will use one MPI process running on the CPU as the "leader" process which doesn't do any actual alignments, but instead tracks the sub-processes. If running with GPUs, you will need one MPI process for the leader, and one for each GPU. For Tempest and cetus, this usually means if you are running with 2 GPUs, you need 3 MPI processes. If running with local CPUs only, you can set this to 1.
- Number of threads: Set this to as many as you can use without running out of memory, if using CPUs. If using GPUs, this can be left at some low number (such as 6) as only the leader will be running multi-threaded.
After it completes, it will output a file called "class_averages.star' which contains the class averages.
2D Class Selection
After averaging your classes, you want to select good ones that are then used for further iterations of particle picking and 2D class averaging, or to create your initial 3D model. Additionally, you want to exclude junk particles. To do this, run the "Subset selection" job.
I/O:
- Select classes from model.star: Browse to the output of your 2D classification job. Usually called something like "run_it025_model.star" or whatever your final iteration number is.
Class options:
- Re-center the class averages? Yes
- Regroup the particles? No
Subsets:
- You can specify for RELION to automatically choose which subsets to select. We will skip this for the tutorial.
Duplicates:
- OR: remove duplicates? No
Running:
- Everything here should be disabled.
When you run the job, a window will open up with options for the display parameters:

You can change the scale, although it's recommended to leave this at 1. For the tutorial, the defaults should be acceptable. Click "Display". You should see all your class averages:

Left-click to select classes you think are real. Right click on a class, and select "Save selected classes" when finished. Then close the window.

The job should output a "class_averages.star" file which contains your selected class averages, and a "particles.star" files that contains their associated particles.
3D Initial Model
It is now time to assemble an initial 3D model from the selected classes. This 3D model is typically low resolution, and is often iterated on, and refined. It is also quite computationally expensive to create.
I/O:
- Input images STAR file: Browse to the "particles.star" file from your 2D Class Average Selection job.
CTF:
- Do CTF-correction? Yes
- Ignore CTFs until first peak? No
Optimisation:
- Number of classes: 1 is sufficient for the tutorial. If you think you have multiple 3D conformations, you can tell RELION to try and sort them into additional classes here. This will increase computational time.
- Mask diameter (A): Setting this to what you used for your 2D classification is usually sufficient. 200 for the tutorial works well.
- Flatten and enforce non-negative solvent? Yes
- Symmetry: It is recommended to start with C1 even if you know your molecule has higher symmetry, because of how stochastic gradient descent algorithms work.
- Initial angular sampling: 15 degrees is usually sufficient. It is better to leave this broad for this step, and make it finer in subsequent refinements.
- Offset search range (pix): 6
- Offset search step (pix): 2
SGD:
- We typically leave these to default numbers. Read advanced RELION documentation if you are having trouble with your models and want to try fine-tuning these parameters.
Compute:
- Most of these compute settings are the same as those used in 2D classification. Again, it is recommended to GPU accelerate this job if possible.
- Skip padding? No
- Skip gridding? Yes
Running:
- The running parameters behave identically to those used for 2D classification.
The job should output a .mrc file that you can open in programs like UCSF Chimera or in RELION itself. While the .mrc file is actually 3-dimensional, when viewed in RELION you will instead see slices
along the Z axis.
3D Auto-Refine
Once the initial model is generated, RELION can refine the structure against the model using much finer parameters. It will also separate the dataset into two halves and refine each independently (the so-called "Gold-Standard") approach, and use each half to determine convergence at the highest-resolution true structure. While there are a number of parameters and settings, most don't do much to change the resolution to which the model refines to, and therefore this job is actually quite straightforward.
I/O:
- Input images STAR file: Browse to the "*_data.star" file from your initial model job.
- Reference map: This is the
.mrcfile from your initial model job. - Reference mask: Ignore this unless doing a focused-refinement
Reference:
- Ref. map is on absolute greyscale? No
- Initial low-pass filter (A): 50
- Symmetry: If you know the symmetry of your molecule, or have a guess, set it here. For the tutorial, this is D2
CTF:
- Defaults should be fine here
Optimisation:
- Set these to match the 3D initial model job
Auto-sampling:
- The defaults here are usually fine. The angular sampling interval will increase automatically throughout the refinement to the point of convergence, so you are only setting the starting coarseness.
Compute:
- Set this to match the 3D initial model job
Running:
- Set this to match the 3D initial model job with one important exception: you will need a minimum of 3 MPI processes even if using CPUs, because the data must be split into two halves, and each half must be refined separately. This means you once again need one MPI "leader" process, and one MPI process for each half.
- If running on GPUs, you will need at least two GPUs, one for each half of the data.
This job can take some time to complete, especially with large datasets. It will output a refined particle set, as well as a refined 3D model. The log will also display the FSC calcuations and determine the resolution of the structure.
RELION on Tempest
Submitting jobs from Tempest requires some important differences, most of which are in the "Running" tab. If the job is running on the CPU compute or GPU compute servers, you must submit the job to the queue. RELION can handle most of this automatically, but you must enter some information for it.
Launching RELION
To launch RELION on Tempest, you must first load the RELION module. You can do this with the following command:
module load cryoem/relion
To load a specific version of RELION, you can append the version number after it (if available), such as:
module load cryoem/relion/4.0
To see which version are available, run:
module search relion
Once a version is loaded, you can start it by running relion, or to run it in the background, run relion &. This should start the RELION GUI. If you receive errors, make sure you logged in
to Tempest with the -X or -Y flag to enable GUI forwarding.
By default, RELION will automatically load ctffind 4.1.5. If you need a different version of ctffind, contact cryo-em_facility@montana.edu for help.
To test if ctffind is loaded correctly, after loading the RELION module, you can run ctffind and the program should start. (Ctrl+C to exit it).
Submitting Jobs
There are two types of jobs in RELION.
- Those that run in the main RELION process, such as subset selection or other small, meta-jobs.
- Those that require running on a compute server (CPU or GPU).
The first type of job is fine to run on the login node as it usually does not use much CPU and is over in a few seconds. The second type of job must be submitted to the SLURM cluster using the queuing system. Thankfully, RELION has a built-in GUI-based job submission feature. However, you must set some parameters correctly in the "Running" tab to use it. Below is an example:

- Submit to queue? You must set this to Yes to submit the job to the SLURM cluster.
- Queue name: This is the name of the partition you wish to run it on.
- For CPU jobs:
priority - For GPU jobs:
gpupriority - For unsafe jobs:
unsafe - For more information on partitions, contact tempest-support@montana.edu
- For CPU jobs:
- Queue submit command:
sbatchshould submit the sbatch file that RELION generates. - Tempest account: This defaults to
priority-and should be appended by the name of the Tempest account you are using to run jobs. This is not your NetID, but rather is usually the name of the group that purchased time on Tempest. - Standard submission script: This is the default template to generate the sbatch file that is used to submit the job. If you need to change this, copy the submission script to your local directory, make your changes, and point RELION to that one instead.
- Minimum dedicated cores per node: 1 is fine here.
- Additional arguments: Leave this blank.
Viewing Files
Because Tempest is a combination of command-line and GUI forwarding, it is not great for viewing output files. However, most RELION windows work fine.
- If you wish to view the
.mrcoutputs in software like UCSF Chimera, it is recommended to first download them to a local computer. - If you wish to view the
.pdflog files, the normal RELION "Display" button will not work because there is no native PDF viewer installed on Tempest. You can either download the files to a local computer to view them, or you can load Firefox withmodule load Firefox, launch Firefox with thefirefoxcommand, pressCtrl+Oto open the file navigator dialog, and navigate to the.pdffile you wish to open, and open it to view in Firefox.
CryoSPARC Integration
CrYOLO is a fast and accurate fully automated particle picker for cryo-EM
CryoSPARC integration requires loading the crYOLO conda environment and installing tools Cryosparc-tools with pip, if not already done:
conda activate cryolo
pip install cryosparc-tools
Once done, use the following CrYOLO script to run a crYOLO job:
import sys

from cryosparc.tools import CryoSPARC

from io import StringIO

import numpy as np

from numpy.core import records

from cryosparc import star

from cryosparc.dataset import Dataset


##################################################################################################################################################

#    VARIABLES                                            VARIABLES                                             VARIABLES                        #

##################################################################################################################################################


# CryoSPARC Master Settings

cs_host = "mycrosparc.mycampus.edu"                        # URL of CryoSPARC Master instance

cs_port = 39000                                     # Port of CryoSPARC Master instance

cs_email = "myemail@mycampus.edu"                  # Email address of your CryoSPARC account

cs_pass = "mypassword"                                # Password for your CryoSPARC account

cs_license = "mylicensenumber"                     # License key for your CryoSPARC instance


# Job Settings - Replace n with number

job_title = "crYOLO Picks"                          # Title for your job

cs_project = "Pn"                                   # Project number

cs_workspace = "Wn"                                 # Workspace number to create jobs in

training_micrographs = "Jn"                         # Job number with output that is to be used as input for training

training_micrographs_output = "exposures_rejected"             # Which job output group to use (can get from job metadata if needed)

training_particles = "Jn"                           # Which job contains the particles to use for training

training_particles_output = "particles_rejected"    # Which output from that job to use for training particles

picking_micrographs = "Jn"                          # Which job contains the micrographs to pick

picking_micrographs_output = "exposure_group"              # Which output from that job to use


# crYOLO Settings

threshold = "0.3"                                   # Threshold for crYOLO picker - defaults to 0.3. Lower to get more picks, raise to get fewer picks.

gpu_number = 0# Enter "0" to use 1st GPU, "1" to use 2nd GPU, or "0 1" to use both GPUs


#SLURM Settings

slurm_array = True                                 #Set to "True" if using a SLURM array to submit multiple jobs.


#################################################################################################################################################


if slurm_array == True:

    print("SLURM array set to true. Submission will be: ")

    picking_micrographs_output = picking_micrographs_output + "_" + str(sys.argv[1])

    print(picking_micrographs_output)

else:

    print("Standard submission - no SLURM")


#Setup CryoSPARC Connection

cs = CryoSPARC(host=cs_host, base_port=cs_port, email=cs_email, password=cs_pass, license=cs_license)

assert cs.test_connection()


#Setup Job

project = cs.find_project(cs_project)

job = project.create_external_job(cs_workspace, title=job_title)

job.connect("train_micrographs", training_micrographs, training_micrographs_output, slots=["micrograph_blob"]) #Micrographs to use as input to training network

job.connect("train_particles", training_particles, training_particles_output, slots=["location"]) #Particles to use as input to training network

job.connect("all_micrographs", picking_micrographs, picking_micrographs_output, slots=["micrograph_blob"]) #Micrographs to pick from

job.add_output("particle", "predicted_particles", slots=["location", "pick_stats"]) #Initialize output

'predicted_particles'


job.start() #Initializes an external job


#Create necessary directory structure

job.mkdir("full_data")

job.mkdir("train_image")

job.mkdir("train_annot")


all_micrographs = job.load_input("all_micrographs", ["micrograph_blob"])

train_micrographs = job.load_input("train_micrographs", ["micrograph_blob"])


for mic in all_micrographs.rows():

    source = mic["micrograph_blob/path"]

    target = job.uid + "/full_data/" + source.split("/")[-1]

    project.symlink(source, target)


for mic in train_micrographs.rows():

    source = mic["micrograph_blob/path"]

    target = job.uid + "/train_image/" + source.split("/")[-1]

    project.symlink(source, target)


job.mkdir("train_annot/STAR")

train_particles = job.load_input("train_particles", ["location"])


for micrograph_path, particles in train_particles.split_by("location/micrograph_path").items():

    micrograph_name = micrograph_path.split("/")[-1]

    star_file_name = micrograph_name.rsplit(".", 1)[0] + ".star"


    mic_w = particles["location/micrograph_shape"][:, 1]

    mic_h = particles["location/micrograph_shape"][:, 0]

    center_x = particles["location/center_x_frac"]

    center_y = particles["location/center_y_frac"]

    location_x = center_x * mic_w

    location_y = center_y * mic_h


    outfile = StringIO()

    star.write(

        outfile,

        records.fromarrays([location_x, location_y], names=["rlnCoordinateX", "rlnCoordinateY"]),

    )

    outfile.seek(0)

    job.upload("train_annot/STAR/" + star_file_name, outfile)


job.subprocess(

    (

        "cryolo_gui.py config config_cryolo.json 130 "

        "--train_image_folder train_image "

        "--train_annot_folder train_annot"

    ).split(" "),

    cwd=job.dir(),

)


train_string = "cryolo_train.py -c config_cryolo.json -w 5 -g %s -e 15" % (gpu_number)


job.subprocess(

#    "cryolo_train.py -c config_cryolo.json -w 5 -g 0 -e 15".split(" "),

    train_string.split(" "),

 cwd=job.dir(),

    mute=True,

    checkpoint=True,

    checkpoint_line_pattern=r"Epoch \d+/\d+",  # e.g., "Epoch 42/200"

)


job.mkdir("boxfiles")


predict_string = "cryolo_predict.py -c config_cryolo.json -w cryolo_model.h5 -i full_data -g %s -o boxfiles -t %s" % (gpu_number, threshold)


job.subprocess(

#    "cryolo_predict.py -c config_cryolo.json -w cryolo_model.h5 -i full_data -g 0 -o boxfiles -t %s".split(" ") % threshold,

 predict_string.split(" "),

    cwd=job.dir(),

    mute=True,

    checkpoint=True,

)


output_star_folder = "STAR"


all_predicted = []

for mic in all_micrographs.rows():

    micrograph_path = mic["micrograph_blob/path"]

    micrograph_name = micrograph_path.split("/")[-1]

    height, width = mic["micrograph_blob/shape"]


    starfile_name = micrograph_name.rsplit(".", 1)[0] + ".star"

    starfile_path = "boxfiles/STAR/" + starfile_name

    locations = star.read(job.dir() / starfile_path)[""]

    center_x = locations["rlnCoordinateX"] / width

    center_y = locations["rlnCoordinateY"] / height


    predicted = job.alloc_output("predicted_particles", len(locations))

    predicted["location/micrograph_uid"] = mic["uid"]

    predicted["location/micrograph_path"] = mic["micrograph_blob/path"]

    predicted["location/micrograph_shape"] = mic["micrograph_blob/shape"]

    predicted["location/center_x_frac"] = center_x

    predicted["location/center_y_frac"] = center_y

    predicted["pick_stats/ncc_score"] = 0.5


    all_predicted.append(predicted)


job.save_output("predicted_particles", Dataset.append(*all_predicted))

job.stop()